Showing posts with label arduino. Show all posts

Saturday, 23 May 2015

Arduino Ethernet Shield

Becoming more adventurous

Life has been busy, but that doesn't mean I haven't been doing a lot of thinking. I've been following a gentleman called Jonathan Oxer for the past year or so because I came across his channel on You Tube all about Home Automation. I think he's absolutely brilliant and making his shows and he certainly inspired me to pick up Arduino.

That was in 2014, for Christmas I persuaded my partner to buy me a starter set (which is a very comprehensive set that I do recommend for anyone) and thus I started learning. I got about halfway through the "manual" before life became a bit hectic and never got a chance to do any more with it. 

The problem I had was that a lot of cool things that were being done using Arduino almost all involved networking to it in some form. The most commonly used way was an Ethernet Shield. So I just had to get one!

Official Arduino Ethernet Shield

Unboxing

Despite owning an Arduino for a year now, I still get shocked at how small it really is! I got home tonight to find the infamous RS bag on the dining room table so I knew what it was (to be truthful I knew what I was coming home to because I had been tracking the parcel all day!)

Arduino shield box next to a standard 3.5" hard drive


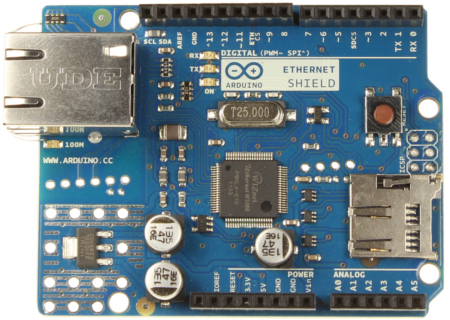
Inside the tiny package is the Ethernet shield, a small warranty booklet and some cool Arduino stickers. The shield itself comes with the pins secured in some foam. Below you can see the standard RJ45 Ethernet network port. It should be noted however that the chip set only supports 10/100 Ethernet.

Arduino shield, front

Arduino shield, side

Arduino shield, rear


The great feature about this shield is that it also has an SD card slot which means you can do data logging which you can see in the picture above, in the bottom left corner of the board, but also indicated below.

Micro SD Card Slot

Secondly, it also has an expansion feature that allows you to use a PoE chip. A PoE chip allows the extraction of power that has been put into the unused wires of Ethernet (either by a special switch or a PoE injector). This is useful for deploying your devices where they might not necessarily be in a place where you can get a plug to them.

Power over Ethernet Adaptor

What to do?

Well now I've got my Ethernet shield I intend to start using it by creating some data logging projects to see if I can have the Arduino capture data and then publish the data to somewhere like Google Docs. Although in the interim I'll just log to the SD Card and extract the data on an ad hoc basis for doing some analysis.

Sunday, 11 January 2015

Keeping organised: electronic components

Background

As you all know, I received an Arduino Starter Kit for Christmas, I gave a quick un-boxing guide here. 

The Electronic Components box in the kit contains, quite shockingly, all your electronic components, such as resistors, potentiometers, switches, LEDs. You do get quite a good selection, a very good selection if I'm completely honest! And they all come in this nice neat anti-static bag. 

Herein is the issue.

All these components with tiny and some not-so tiny legs all in one bag, and you are after one in particular ... What can possibly go wrong?

Well I'm an organisation / planning freak so I like everything neat and organised and to know where they are. If you are in a professional workshop and producing hundreds of boards, you probably have your bench with lots of these :


The one above is quite a small one, you can get these with over 100 drawers in. And they are the perfect width for having the tapes that resistors come on in without breaking them out. Ideal!
However for those of us whom are just starting in electronics these are both a) big and bulky b) more than you need c) can be very expensive!
So something else is needed ...

The Solution!

I was having a wander around B&Q in the post-Christmas sales, I was after some mirror mounting pieces, but whilst comparing the prices to both Homebase down the road and Amazon, I found (thinking back I really should have known this .... ah young, first-home-owner, lessons learned) that B&Q was a rip off!

So whilst walking to the door I just happened to spot piles of Really Useful Boxes. Now I've used these for nearly 10 years. I first encountered them when I was getting ready for university. My mum bought me a load (being a teenager I never noticed prices, especially when others were paying - it was her choice she suggested them!) and as such they were used to move me in, out and up and down the country for years. Having bought my first home in April 2013, it is only today I noticed that one of them (of about 15 I own!) has a crack in the corner - no where near bad enough to warrant it being binned, still massively useful, in fact its role hasn't even changed because of the crack!

So after all these years they have stood up to a lot of abuse and I can definitely vouch for them, yes they are expensive, but these will out last the contents! Anyway I digress

So I spotted the big ones and told the other half about them, she winced when she saw the prices! But then I spotted a palette of the tiny little ones that you use on your desk. There's no way I would buy them because really how useful would they be? To me, I doubt I'd use them, but then I saw a multipack like this :


All for £7. Thinking "pah, rip-off B&Q, let's see what my dear friend Google has to say" ... a few swishes on the smart phone later I was pleasantly shocked to see that Google says that B&Q was the cheapest! So I bought said pack!

Coming home I wanted to get on with organising all my components in my organisation freaky way.... I have to admit, I was slightly elated when I got home to do this, so on the sofa I went and poured out the components from the anti-static bag and started sorted into each tub. Each tub contained its own type of component. For instance one held switches, but also the potentiometers and the tilt switch. Another held all the LEDs, another had all the resistors (in an ideal world I'd like a box for each value of resistor!)

In the end, this is my newly organised array of boxed components :


So everything in its place, but where is it's place? Well to take things one step further I dug out the Sharpie marker pen and started labelling up the boxes fortunately, only one of the "fronts" of each box has the embossed Really Useful Box logo, so flipping them around I could start to label up each box with its contents as you can see below.


The very top row, which I've not marked up contains the jumper wires provided in the set, each box contains it's own size of wire from smallest to largest.

I hope that has been interesting. Let me know what you think and how you keep your bits, (electronics! wait that doesn't necessarily remove the innuendo ... ) organised.

Ciao for now!

Saturday, 27 December 2014

Arduino Starter Kit

Arduino Starter Kit


I hope that you all had a great Christmas, I sure did, my favourite present was the official (Italian supplied) Arduino Starter Kit. I have been reading about this particular kit not being produced - I can confirm that RS Components supply it as this was where my kit was purchased from.

Packaging

The Arduino Starter Kit comes in a lovely matt cardboard box very well decorated with sketches that basically sums up all the components you get as part of this kit. The cover shows that you will get the Uno board, plus others such as motors, displays and a whole host of electronic components that we will see more about later.


Opening the box reveals the project book on top. The inside of the lid has a simple message saying :

The original arduino starter kit features 15 simple projects that show you how to use arduino to turn an idea into reality more importantly, it provides the basic knowledge and tools that can bring out your inner genius and fuel your creativity forever - what's your invention going to be?

The final question, highlighted in bold is the important part for me, this kit will give you a wide selection of basic tools and components that you need to start exploiting your arduino micro controller, now it is down to you to put your idea into practise!


The book itself is a guide to learning arduino and basic electronics, I'll discuss this further. The book lays atop a divider under which all the electronic components are underneath.


As part of the starter kit you get the following major "units" of stuff:
  • Liquid Crystal Display (LCD)
  • USB Cable
  • DC Motor and a Servo Motor
  • Breadboard with Jumper wires
  • (a wide selection of) electronic components
  • an Arduino Uno board
Before we unbox each of these components, underneath the boxes that hold these parts, there are some cardboard cuts outs that are used for the projects in the book (later) as well as a wooden board that has been laser cut.


Arduino Uno microcontroller board


The Uno is the heart of your system. The Uno is constructed based on an ATMega328 processor (that's the large black bit middle-bottom right.

Arduino UNO Rev3


The board can be powered in one of two ways, either via the USB port from your PC, or through the DC jack (bottom-left) possibly using a mains plug. This can operate over a massive range of 6-20 V, but just to be safe against voltage ripples and surges, a DC plug in the 7-12 V is recommended.

There are 14 dual-purpose (input or output) digital pins. Of which 6 of these can be configured to use Pulse Width Modulation (PWM) - basically this is a way of switching the output between 0 and 1 that means the output device "sees" an average of something other than 0 or 1, say 0.6.

Finally there are 6 analogue inputs which you could use for say a temperature sensor.

Breadboard and Jumper Wires

The breadboard is using for prototyping electronic circuits and can be seen in the image below. The pins from components such as Light Emitting Diodes (LEDs) just slot into the holes. You can then add wires from batteries or even the arduino Uno board to provide power and read signals.


You get four different lengths of wire. The wires have had the ends pre-bent so that you can slot them into the breadboard and the wires will lay flat. At this point I've got reservations about the robustness of these wires, concerns which may be proved / aleviated in a more long term assessment.

Mounting Board

The wooden board is a useful mounting for your Uno board since it is so small. The board has been laser cut to have all the shapes you need, these include small legs that act as a riser for the board. The rest are items you will need in the projects.


A little note - the screws (and nuts) for mounting your Arduino to this board are hidden in the Electronic Components box. Once you've got the breadboard and the Arduino mounted, you now have them closely mounted and mounted securely together, so you needn't worry about knocking either and pulling all your wires out.


USB Cable

Yes its a cable, nothing exciting really? Not quite. I am impressed with this cable (I'm guessing that says a lot about me!). If you think about whenever you've got a USB cable with your new mobile phone, its usually a scrawny short one with a flimsy connector. Well not so with this one, the cable is nice and chunky and is about 1.5m long which makes it really nice for attaching into those USB ports on the back of your PC, running up behind the desk and onto your workstation with plenty of length to manoeuvre it into a position to suit you to work with.


Electronic Components

When you open up the Electronic Components box, here is a list of all the parts that you get:
  • Battery Snap
  • Capacitors (3 types)
  • Diode
  • Gels (colour filters)
  • H-bridge 
  • LEDs (blue, red, green, yellow and RGB)
  • Optocoupler
  • Piezo 
  • Photo resistor (LDR)
  • Potentiometer (3 off)
  • Push button (4 off)
  • [lots of] Resistors
  • Thermistor (4 off)
  • Tilt sensor (1 off)
  • Transistor (3 off)
I found a picture from RS Components to show everything that you get (not just the electronic components) as you can see, you do get a lot!
Arduino Starter Kit with UNO board

Liquid Crystal Display

Getting this was a surprise, I was convinced that I wouldn't get this and that you could only get this as a shield or some other accessory. The pins for the display come inserted into some foam which is brilliant for keeping them protected and not getting bent, or worse broken, during transport. 


DC Motor and Servo Motor

In the DC Motor box, you can find the DC Motor and Servo Motor. Also included are some attachments to go on the rotor (the bit that will move) to give you slightly different movement effects in a small plastic bag.


I must admit, I really like the pins provided on the wires for the Motor (bottom left), the chunky plastic where the wire meets the pin is great to grip with and either pull from or push the pin into the breadboard.

Project Book

The final beauty of this pack is the Project Book. It is a beautifully well presented and very well made book that takes you step-by-step through each project and explains thoroughly, without any patronisation, everything you need to know and do.

Conclusion

Personally, I'm absolutely thrilled with the Arduino Starter Kit and I can't wait to get started. As I do new and interesting things I'll put up post about it. Are you doing anything interesting with your Arduino or other DIY hobbyist electronic systems like Raspberry Pi? Let me know!